How to Measure Kitchen Cabinets for Organizers (Before You Buy)
A pull-out basket, shelf riser or door rack can look perfect online and still not fit. The hinge blocks the opening. The tray sticks out too far for the door to close. The riser leaves no room to lift out a mug.
Most guides on how to measure kitchen cabinets are written for remodeling: wall lengths, box heights, layouts for new cabinetry. That isn’t what you need here. When you’re buying an organizer for a cabinet you already own, the outside size tells you very little. What matters is the space you can actually get something through and set down.
This guide shows you how to measure kitchen cabinets for organizers step by step, what to check around hinges, shelf pins, and pipes, and how to compare your numbers with a product’s listed dimensions before you order.
Short answer: Measure three things: the clear opening width (the narrowest gap an organizer must pass through), the usable depth (back wall to where the closed door sits) and the clear height (to the lowest obstruction). Check hinges, shelf pins and pipes. Leave about ½ inch of slack. Then compare your numbers with the product’s listed minimum opening, overall depth and overall height.
Face-frame or frameless? Check this first
Open a cabinet door and look at the front edge of the box.
Face-frame cabinets have a wooden frame attached around the opening. The vertical pieces are stiles and the horizontal pieces are rails. The frame sticks into the opening, so the gap you can slide something through is narrower than the box behind it. Stile widths vary, but about 1½ inches is common. In many face-frame cabinets, that makes the opening roughly the cabinet width (measured across the front) minus two stile widths: about 21 inches for a 24-inch cabinet. Measure your own opening instead of relying on the label.
Frameless (European-style) cabinets have no front frame, so the box sides form the opening. Hinge plates and the open door can still intrude, so measure the clear gap instead of assuming you get the full interior width.
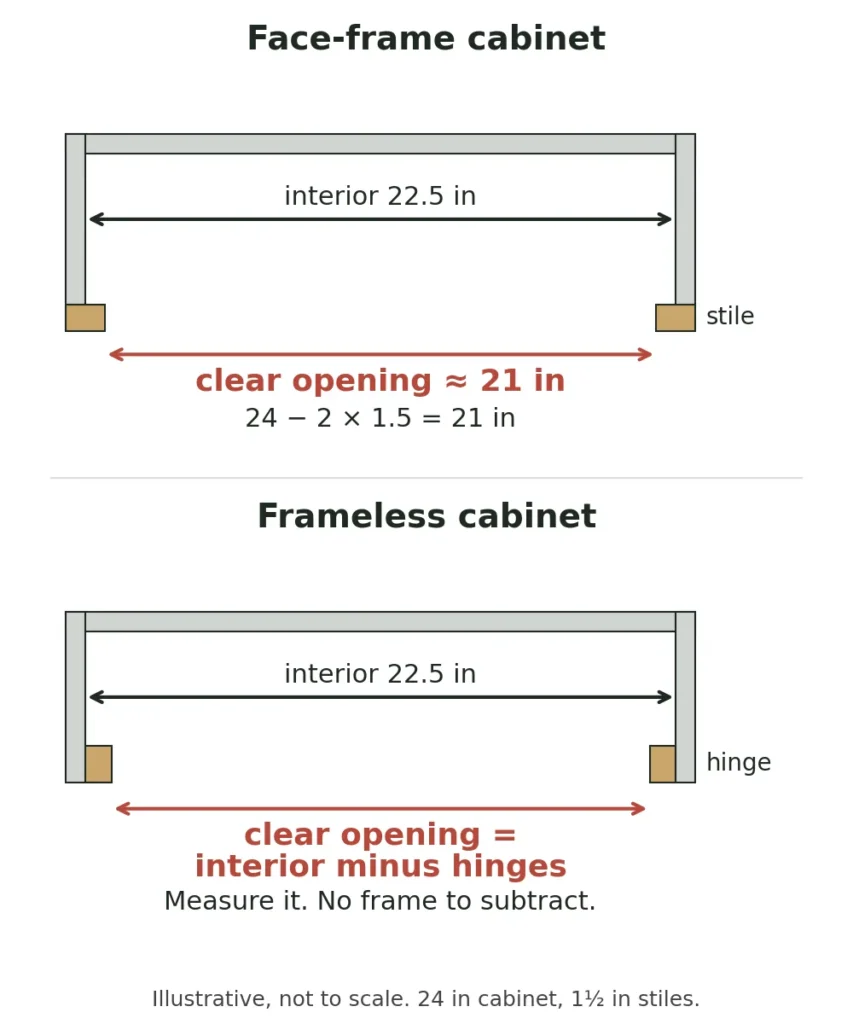
Not sure which you have? A wooden border sticking into the opening means face-frame. Hinges mounted straight onto the inside of the side wall, with a flush opening, means frameless.
How to Measure Kitchen Cabinets for Organizers: The Three Measurements
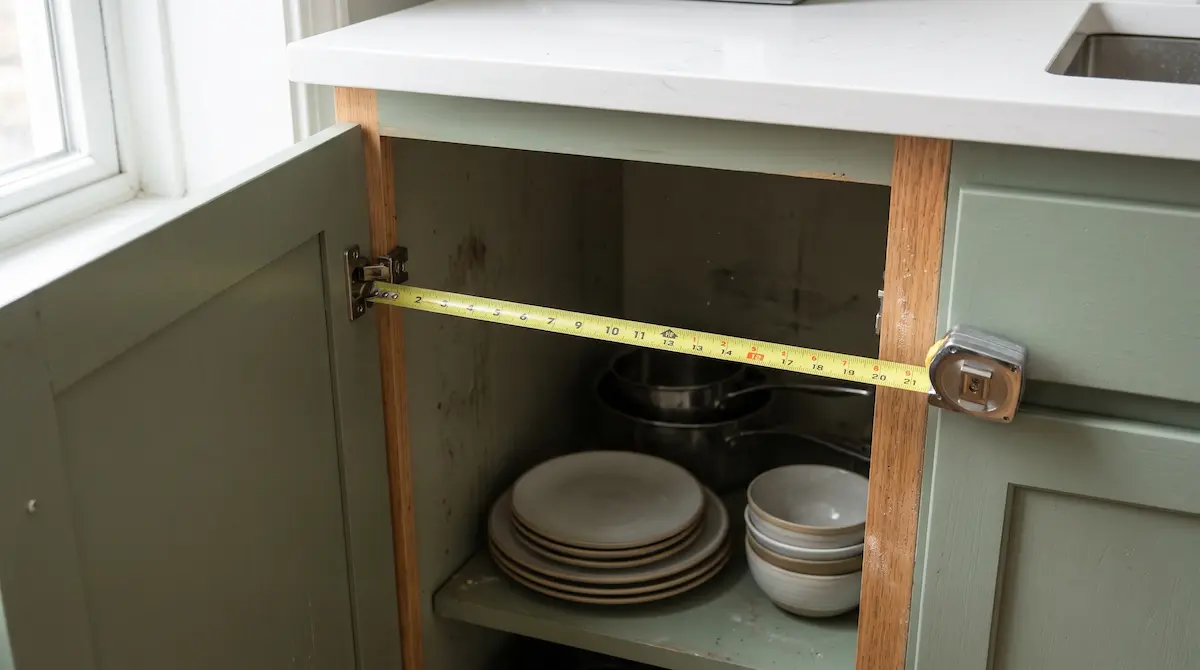
Use a rigid metal tape measure and write every number in one unit, inches or millimeters, so you can compare it with the product listing.
1. Clear opening width
This is the narrowest horizontal gap an organizer has to pass through on its way in.
- Face-frame: hook the tape on the inside edge of one stile and stretch it to the inside edge of the other. Frameless: measure between the side panels at the front.
- Open the door to the angle where it actually stops. If a hinge or the door edge sticks into the gap, measure at that point.
- Double doors with a center stile: measure each side separately. An organizer that has to go in through one side is limited by that side.
2. Usable depth
This is the front-to-back space for something that sits on the cabinet floor or a shelf, with the door still able to close.
You can’t run a tape to a closed door, so find the plane where the inside face of the closed door sits:
- A full-overlay door closes against the front of the frame, so that plane is roughly the front edge of the frame.
- An inset door sits inside the frame, so its inside face is set back by the door’s thickness (often about ¾ inch).
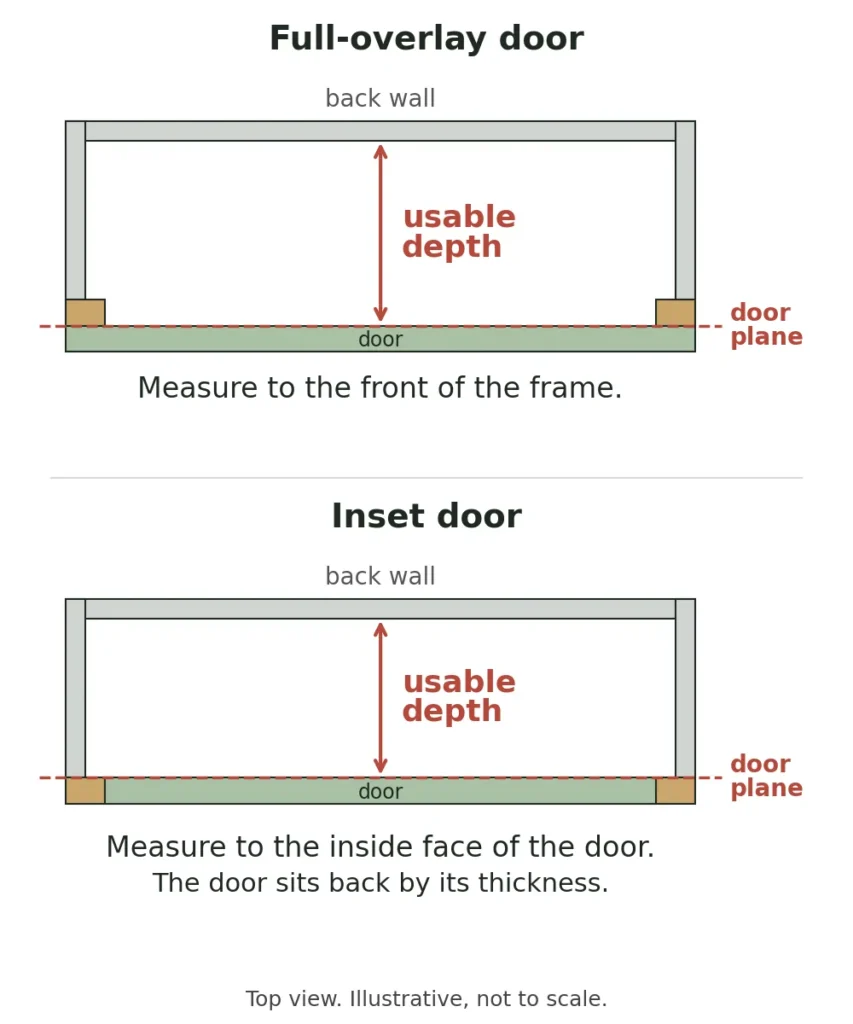
Measure from the back wall to that plane. Note anything on the back wall that sticks out: pipes, wall fasteners, door bumpers. Then compare the result with the organizer’s overall assembled depth, including handles and pull tabs.
3. Clear height
This is the space from the surface the organizer will stand on up to the lowest thing above it.
- Put the tape on the cabinet floor or the shelf and run it up to the lowest obstruction: the underside of the shelf above, a drawer box, drawer slides or a top frame rail.
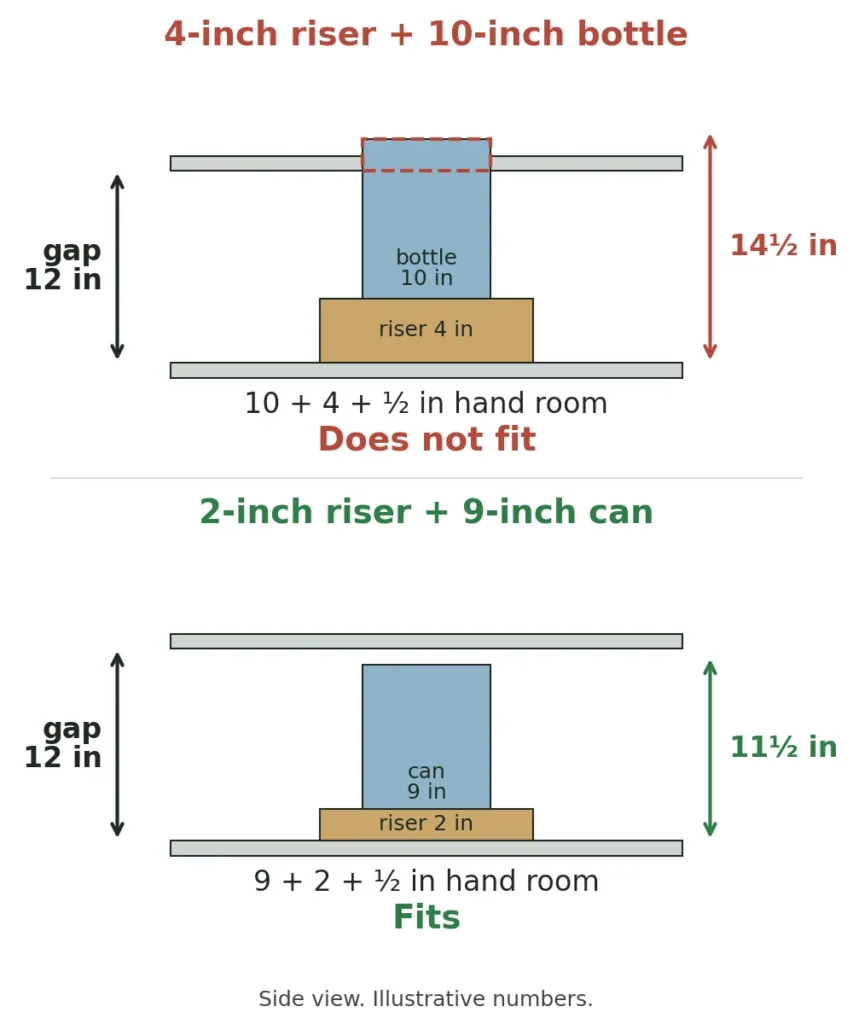
- For a shelf riser, the riser’s height plus the tallest item you’ll put on it, plus room to lift that item out, has to fit under this number.
Check these obstructions before you buy
The three measurements give you the box. These checks show you where an organizer will actually catch.
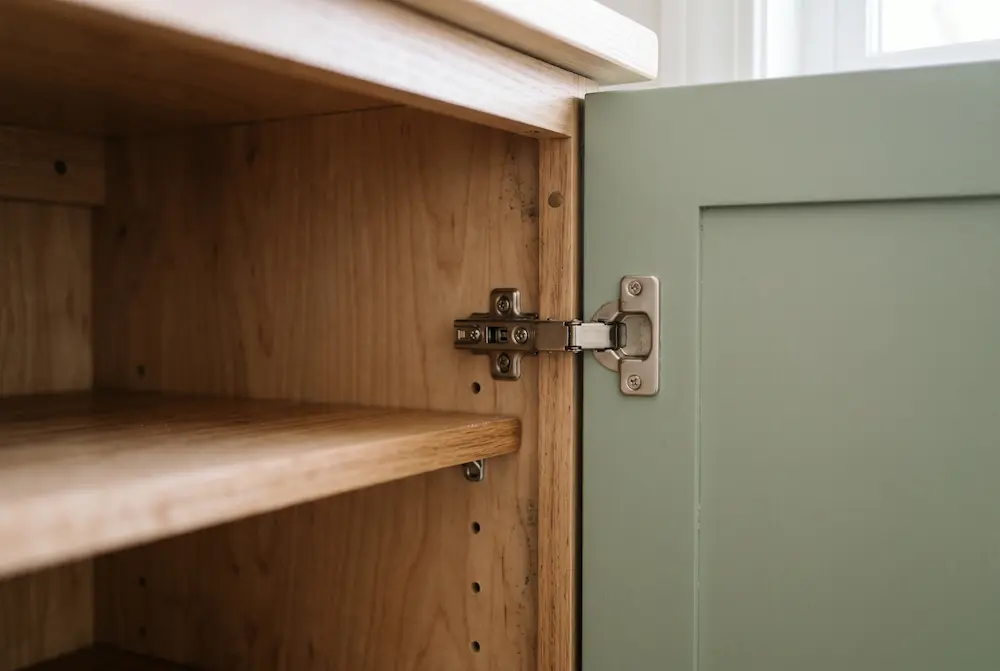
Hinges and door swing. Doors don’t always open fully. A wall, appliance or neighboring cabinet can stop a door at 90 degrees and leave its edge in the entry path. Check the hinge body and mounting plate at the height where the organizer or its slides will pass, and confirm the organizer won’t stop the door from closing.
Shelf pins and dividers. Adjustable shelves rest on pins or clips that stick in from the sides, and they can snag a snug bin. A fixed center divider makes two separate cabinets, so measure each side on its own.
Plumbing and disposals. Under a sink, the drain, trap, supply lines and disposal take up the middle of the cabinet. Measure the open space around them, not the cabinet as a whole. Our under-sink organization guide goes through the plumbing in detail.
A raised bottom rail. Some face-frame base cabinets have a bottom front rail that sits above the cabinet floor. A tray that slides on the floor can catch on that lip. Check whether the floor is level with the rail or below it, and read the product’s installation sheet before you buy. Add spacers or risers only if the manufacturer’s instructions allow it.
The ½-inch rule (our rule of thumb)
Cabinets are rarely perfectly square, and a fit that is tight on paper means scraping and forcing. As a rule of thumb (ours, not an industry standard), leave about ½ inch of slack on width and depth, and about ½ inch of hand room above the tallest item. Rigid wire and plastic need that slack more than soft fabric bins do.
Worked example (illustrative numbers, use your own). A 24-inch face-frame base cabinet with 1½-inch stiles:
- Clear opening: 24 − (2 × 1.5) = 21 in. Largest organizer to try: about 20½ in wide.
- Depth to the door plane: 22 in. Largest organizer: about 21½ in deep.
- Gap between shelves: 12 in. Tallest item: 10 in. A 4-inch riser needs 14½ in (10 + 4 + ½), so it won’t fit. A 2-inch low-profile riser under 9-inch cans needs 11½ in, so it will.
How to read the product listing
The listing, not the photo, tells you whether something fits. Find these lines and compare each one with your numbers:
- Minimum opening width, depth and height (pull-outs). Manufacturers such as Rev-A-Shelf list these separately from the product’s own size. Don’t guess the requirement from the product width. One 5-inch-wide base pull-out lists a 5⅛-inch minimum opening width, while an 8¾-inch-wide model lists 8½ inches. Requirements vary by model, so check the exact product you plan to buy.
- Overall assembled depth and height, including handles.
- Notes for your door type. One pull-out listing adds ¾ inch to the minimum depth for frameless inset cabinets.
- Door thickness range (hook-on racks). Listings for over-the-door hooks usually state the door thickness they fit, often a maximum of about 1 inch or less for cabinet doors, and sometimes the gap they need above the door.
If a listing doesn’t give a minimum opening or overall depth, ask the seller before ordering, or choose a listing that does.
Fit guidelines by organizer type
Pull-out trays and sliding baskets. Meet or exceed the stated minimum opening width, depth and height. Slides and mounting hardware need clearance beyond the basket itself. If you rent and can’t drill into the cabinets, look at no-drill kitchen storage options for renters, and still check the footprint and clearance.
Turntables (Lazy Susans). Two checks: the tray has to fit through the opening, and it has to rotate without touching the walls, the door or the hinges. Compare its diameter with your narrowest dimension and use the manufacturer’s sizing guidance.
Shelf risers. Add the riser’s height to your tallest item and compare the total with your clear height, leaving hand room. Width and depth have to fit the shelf too.
Over-the-door racks. Measure the door’s thickness at the top edge and match it to the hook’s stated range. Check the gap above the door: hooks need a small clearance, and some listings state about 0.06 to 0.08 inch. Then check how far the basket will sit inside when the door closes. Shelves set close to the front can keep the door from shutting, and some listings warn about this.
Copy this worksheet
Fill in one row per cabinet, on paper or in your notes app.
| Cabinet | Opening width | Usable depth | Clear height | Max organizer size |
|---|---|---|---|---|
In the last column, record the largest organizer size that appears to fit, written as width × depth × height. For loose organizers such as bins, trays and risers, you can use ½ inch of clearance as a starting point, but this is only a rule of thumb—not a universal fitting requirement. For shelf risers, also account for the height of the items and the room needed to lift them out. For pull-outs and other products with published minimum opening or installation requirements, follow the manufacturer’s specifications.
Decide what you need before you shop
Measuring tells you what fits, not what you need. Decide what the cabinet should hold first. Our guide to how to organize kitchen cabinets covers that step.
FAQ
Why is my 30-inch cabinet opening smaller than 30 inches?
The label is the outside width. In a face-frame cabinet the stiles reduce the opening. With 1½-inch stiles, a 30-inch cabinet has about 27 inches of clear opening, and a 1½-inch center stile splits that into two openings of about 12¾ inches each. That is illustrative arithmetic, so measure yours.
How deep are kitchen cabinets?
Base cabinets are typically 24 inches deep, not counting the countertop, and upper cabinets about 12 inches. The depth you can use is less, so measure to the door plane as described above.
Should I measure the inside or the outside of the cabinet?
For organizers, measure the clear opening and the usable space inside. The outside size ignores the frame, hinges and door.
What if my measurement falls between two sizes?
Don’t automatically round up. Check the minimum opening, overall depth and installation notes, keep your ½ inch of slack, and ask the seller if anything is unclear.
Checklist before you order
- Clear opening width, measured at the narrowest point
- Usable depth, from the back wall to the door plane
- Clear height to the lowest obstruction
- Hinges, shelf pins, pipes and any raised bottom rail checked
- Your numbers compared with the exact product’s listed dimensions
- Doors, drawers and moving parts clear of the organizer
- Installation method checked against your lease, if you rent
How we put this guide together: typical cabinet sizes come from published guides such as Bob Vila’s guide to standard kitchen cabinet dimensions, and the face-frame details from cabinet-maker guides such as RTA Cabinet Store’s face frame vs frameless guide. Product examples come from retailer listings of manufacturer specifications. We haven’t measured your kitchen, so treat the numbers as starting points and let your own tape measure decide.